Bringing Old Family Videos Back to Life in 2026: A Warm, Practical Guide to Reviving Blurry Home Footage
There is a strange ache that comes from pressing play on a video you shot twenty years ago. The moment is there — a birthday, a first step, a grandparent’s laugh — but the picture feels far away. It is soft, a little grainy, and somehow smaller than the memory itself. Most households quietly sit on hours of footage they almost never watch, partly because it looks disappointing on a modern screen, and partly because reviving it once felt like a job for a specialist. In 2026, that gap is far easier to close than most people expect. The same kind of AI that powers everyday photo tools now rebuilds video frame by frame, and much of it runs in a browser tab. This guide walks through why old clips look the way they do, how the newest tools quietly restore them, how to add modern brightness, and how to give a flat, tired video the warmth and clarity it always deserved.
Why Your Old Home Videos Look Worse Than You Remember
Here is the odd part: your old videos have not actually gotten worse. Your screens have gotten better. A clip that looked perfectly fine on a boxy CRT television now plays on a 4K panel four times sharper, and that panel shows every flaw. As one explainer from PointerClicker puts it, large 4K screens are simply less forgiving, revealing limitations in the source that older displays hid behind blur and phosphor glow.
Three things happen at once. First, the TV enlarges, or “upscales,” a small image to fill a huge screen, and basic built-in upscaling simply stretches the existing detail without adding any new information, so faces turn mushy the closer you look. Second, grain and compression noise that a fuzzy old set once masked with blur are now laid bare on a pin-sharp panel, which is exactly why archival TV clips look grainier in reruns than they did live. Third, faded colors and flat contrast look duller against modern displays built for a much wider color range and far higher brightness. None of that is your fault, and none of it means the memory was poorly shot. It is a mismatch between old footage and new glass — and a mismatch is something you can fix.
What Is Actually Happening Inside a Blurry Clip
Before fixing anything, it helps to know what you are fixing. A blurry old video usually carries several separate problems stacked on top of each other, and each one needs a different kind of repair. Understanding them makes every later step feel less like magic and more like sense.
Resolution is the first. Older camcorders and early phones captured far fewer pixels than a modern phone does today, so faces and text turn soft the moment they are enlarged to fill a big screen. Noise is the second: the speckled, grainy texture that shows up most in the dark corners of a frame. It comes in two flavors — luminance noise, the gray sandy speckle, and color noise, the random green or magenta dots dancing where they should not. Then comes fading, the slow drain of color and contrast as dyes age and old compression takes its toll. On top of that sit shaky handheld motion, occasional interlacing lines from tape sources, and the odd dropped frame. Stack all of that together and you have the full picture of why a cherished clip feels tired — and a tidy checklist of what a good tool needs to undo.
How AI Quietly Rebuilds an Old Video, Step by Step
The tool like UniFab Video Enhancer that does this work in 2026 lean on neural networks — software trained on millions of real video frames until it learns what genuine detail actually looks like. When you hand it a soft, degraded frame, it does not simply sharpen the blur the way a slider in an old editor would. It studies the frame, compares it against everything it has learned, predicts what a clean, higher-resolution version of that frame should contain, and paints that detail back in. Then it does the same for the next frame, and the next, keeping the motion consistent from one to the other so nothing flickers or crawls. That temporal consistency is the quiet secret; without it, an “enhanced” clip shimmers unpleasantly, and with it, the footage simply looks like it was always this clear.
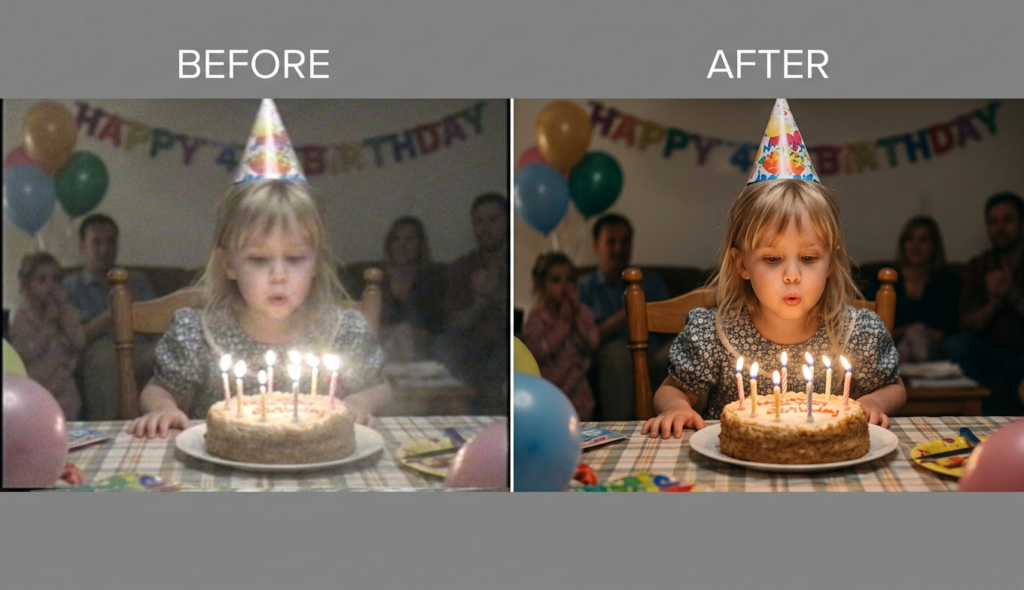
It is worth being honest about one thing. When a face is very blurry, the AI fills it in with what it believes a face should look like at that resolution. It is an educated prediction, not a recovery of lost pixels. For a birthday party or a family reunion, that is perfectly fine — the result feels like the memory, only clearer. For anything where exact accuracy matters, keep that limitation in mind. This is the honest trade behind every “enhanced” old video, and knowing it helps you set fair expectations.
A Simple Four-Step Tutorial for Reviving a Cherished Clip
You do not need an editing background to do this well. The workflow below keeps things gentle and repeatable, and it works whether your footage came off a phone, a camcorder, or a digitized tape.
Step 1 — Gather and label. Pull your clips into one folder and give them clear names. Working from the best available copy matters more than any setting; a copy of a copy loses detail you can never get back.
Step 2 — Clean before you sharpen. Run noise reduction first. Removing grain and speckle early stops the next steps from sharpening the noise along with the image. This single habit separates a natural result from a crunchy, over-processed one.
Step 3 — Upscale and enhance. Now raise the resolution and recover detail. This is where a browser tool like UniFab Video Enhancer earns its place, upscaling blurry, low-resolution clips up to 2x — a 480p file toward 960p, or 1080p toward 4K — while reducing noise, sharpening details, and recovering lost textures. Because it works in the cloud, there is no software to install and no powerful graphics card to buy; you simply upload the clip, let the remote GPUs do the heavy lifting, and download the cleaner version when it is ready. It runs on Windows, Mac, Chromebook, iPad, and phones alike, which means anyone in the family can help with the pile.
Step 4 — Review, then repeat if needed. Watch the result at full size. If a face still looks soft, run it once more or lean on a face-enhancement pass. If motion feels choppy, that is a separate fix. Take it one layer at a time.
Workflow infographic showing restore then enhance then HDR stages for old videos
What to Look For When Choosing a Tool to Revive Old Videos
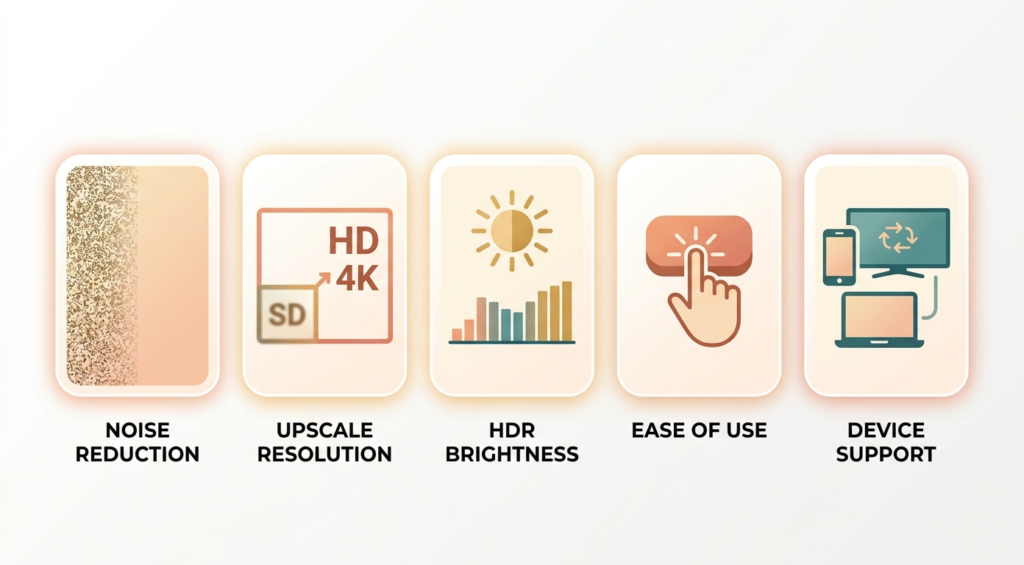
Not every enhancer suits family footage, and the right choice depends less on marketing and more on a short list of practical qualities. Rather than chase feature counts, weigh these against the way you actually work.
Real noise reduction. Old footage lives or dies on grain handling. A good tool separates luminance and color noise and removes both without smearing detail into mush. If dark corners still crawl after enhancement, the tool is not doing this part well.
Genuine upscaling, not just sharpening. Sharpening exaggerates what is there; true upscaling reconstructs new detail. For faces and text, that difference is everything, and it is the single biggest reason an old clip finally looks at home on a big screen.
A path to modern brightness. The best tools can also lift a flat, dull clip into today’s high-brightness color range, so a 2026 TV shows it the way it deserves to be seen. We will come back to this shortly, because it is where most home videos leave real quality on the table.
Ease and honest limits. You want something a family member can run without a manual, and something clear about what it can and cannot restore. A tool that pretends to recover perfect detail from a blur is overselling.
Device support. Footage lives everywhere — phones, laptops, old drives. Browser-based tools that run without a heavy install lower the barrier for the whole family to join in.
Where HDR Comes In — Giving Flat Old Clips Modern Punch
Cleaning up a clip is only half the story. Most old footage was shot in what is called SDR, standard dynamic range, built for the dim tube TVs of its day. It tops out around 100 nits of brightness and a narrow slice of color. Play it on a modern HDR panel and it looks flat and muted, even after sharpening, because it was never made to shine that bright.
This is where inverse tone mapping helps. Rather than just turning up a brightness slider, the AI studies each frame, reconstructs luminance the original never stored, and stretches that narrow range into a far wider one — brighter highlights, deeper shadows, richer but still natural color, all without blowing out the picture. A tool built to Convert SDR to HDR turns 8-bit SDR into true 10-bit HDR, targeting the standards modern displays actually speak: HDR10 at up to 1,000 nits, and Dolby Vision at up to 4,000 nits with dynamic, scene-by-scene metadata. It offers 4K, QHD, FHD, and a fast mode depending on how much time you have, and it can run in the cloud with no GPU required or locally on your own machine.
The effect on a family clip is quiet but real, and it is the step most people skip because they have never heard of it. A sunny afternoon regains the actual glow of the sun instead of a flat gray sky. A candlelit birthday keeps its warm, deep pools of light rather than washing out to a dull haze. Skin tones look alive, and colors that had faded for decades come back with believable life — not the cartoonish over-saturation of a badly tuned TV, but the depth the scene had when you lived it. On a 2026 HDR television or a bright new phone, that is the difference between “an old video” and “our memory, finally looking the way it felt.” Pairing a clean, upscaled clip with an HDR pass is what truly makes decades-old footage at home on today’s screens.
Six Real-Life Scenarios Where Reviving Footage Pays Off
The value of all this is easiest to feel through the moments it protects. Here are the situations where families reach for these tools most often, and why the effort is worth it.
1. A wedding anniversary surprise. Ceremony footage from years ago is often shaky, dim, and shot from the back of a crowded room. Cleaning it up into a smooth, clear montage — then brightening the color so the flowers and the dress look right — is one of the most touching gifts you can hand a couple on a milestone year, and it costs an afternoon rather than a fortune.
2. A grandparent’s story, preserved. Old interviews and rambling living-room chats often hold voices and faces no one thought to save carefully. Enhancing them sharpens the picture just enough to keep those people present and recognizable, turning a fading tape into something the whole family can gather around and hear clearly.
3. Baby’s first everything. First steps, first words, first birthdays are almost always captured in a hurry on whatever phone happened to be nearby, at whatever low resolution it shot. Reviving those clips makes them sharp enough to relive without squinting, and warm enough to feel the moment again rather than just remember that it happened.
4. Digitized tape rescue. VHS and camcorder transfers arrive heavy with noise, interlacing lines, and washed-out color, because the source itself was rough and the digitizing process rarely improves it. A proper cleanup and upscale pass turns a rough, unwatchable file into something you actually want to sit through from start to finish.
5. A memorial tribute. When you gather clips to honor someone who has passed, clarity and warmth matter more than they do anywhere else. Reviving old footage lets the tribute feel like them — their real smile, their real color — rather than a fuzzy, gray stand-in that keeps everyone at a distance from the person they loved.
6. Family history for the next generation. Restored, upscaled, and brightened clips become a genuine archive: files your children and their children can open on whatever screen exists in the future, without wincing at the quality. Doing the work once, well, protects those moments long after the original tapes and drives have failed.
A Real-World Example, With the Numbers
Consider a common weekend project many families take on: digitizing and reviving a shoebox of old camcorder tapes. Take a typical batch of 12 clips, roughly 90 minutes of footage from a 2004 camcorder, transferred to MP4 files sitting at 480p with visible grain and washed-out color. On a laptop screen they look tolerable; on the family’s new 55-inch TV they look every one of their twenty years. This is the exact starting point most people face, so it is worth walking through what actually changes and by how much.
Case before and after showing a flat old clip versus an HDR-enhanced version with natural contrast
The workflow follows the four steps above. Noise reduction goes first, then a 2x upscale lifts the 480p files toward roughly 960p and recovers soft facial detail. Finally, an SDR-to-HDR pass expands the flat 8-bit color into a 10-bit HDR10 file. The measurable shifts are easy to describe: resolution doubles from 480p to about 960p, the color goes from 8-bit SDR at around 100 nits to 10-bit HDR reaching up to 1,000 nits, and grain in the dark areas drops sharply. Cloud processing means no gaming PC is required — batch handling lets all 12 clips queue at once instead of one by one.
The honest part of the story matters here too. The very softest, most water-damaged frames did not come back to full sharpness; some faces stayed a touch soft because the original detail was simply gone. That is the ceiling of any AI enhancement, and setting the expectation up front made the finished montage feel like a genuine win rather than a letdown. On the family’s new TV, clips that had gone unwatched for years finally looked worth gathering around.
Frequently Asked Questions
Can AI really make a blurry old video look sharp again?
It can make it look much sharper, yes. AI upscaling reconstructs detail rather than just sharpening, so faces and scenes gain real clarity. Very blurry faces are predicted rather than perfectly recovered, but for family footage the result usually feels true to the memory.
Do I need a powerful computer to enhance old footage?
Not anymore. Cloud-based, browser tools do the heavy lifting on remote GPUs, so an ordinary laptop, a Chromebook, or even a phone can start an enhancement job without special hardware.
What is the difference between upscaling and HDR conversion?
Upscaling raises resolution and sharpness — it fixes softness. HDR conversion expands brightness and color range so a flat old clip looks vivid on a modern display. They solve different problems, and cherished footage often benefits from both.
Why does my old video look worse on a new 4K TV than on my old one?
Because the new screen is sharper and shows every flaw the old set hid. It also enlarges the small image to fill the panel, which exaggerates softness and grain. The footage did not change; the display did.
Is it worth converting old home videos to HDR?
For anything you will watch on a modern TV or bright phone, it is a meaningful upgrade. HDR restores the depth and glow that SDR footage was never able to show, making decades-old clips feel present and alive.
Will enhancing my footage ruin the original?
No, if you keep your source files untouched and save enhanced versions as new copies. Always work from a backup, and never overwrite the only copy you have of an irreplaceable moment.
How long does it take to revive a batch of clips?
It depends on length and resolution, but cloud tools with batch processing let you queue many clips at once and walk away. A shoebox of tapes is an afternoon project, not a weekend one.
The Verdict: Your Memories Deserve Modern Screens
Old family videos are among the few things that only grow more precious with time. The tools of 2026 finally let them keep up with the screens we watch them on — clearing away grain, rebuilding soft detail, and lifting flat color into the brightness a modern display can show. The workflow is gentle: clean first, sharpen and upscale next, then bring the color into today’s range. Set fair expectations, work from good copies, and let the technology handle the rest. The reward is simple and deeply human — a grandparent’s laugh, a child’s first step, a quiet afternoon long past, all looking the way they always felt. Press play, and let the memory meet the screen it always deserved.
Mircari Quotes And Sayings
 Why Settle for Boring? Building Features That Make Life More Fun
 Best Indoor Seeds: High-Yield Indoor Strains for Every Grower
 Modern Loneliness and the Rise of Paid Companionship Services
 The Comfort Routine People Are Turning To This Year
 What It Actually Takes to Restore a High-Pressure System Back to Full Strength
 Syna World Shorts Set – Summer Style Redefined
 8 Top SASE Vendors Offering Comprehensive Network Protection
 The Golden Rules of Evening Fashion: How to Stand Out Without Overdoing It