5 Proven Ways to Remove Write Protection From USB
After carefully saving your research material on a USB drive, you plug it into your Windows 10/11 computer, only to find out to your astonishment it’s write-protected. You scratch your head thinking when did you change its status to read-only?
In such a situation, you can’t access or copy your files from your flash drive. So, how to remove write protection from USB? But don’t worry, though. If your USB drive is write-protected learn how to remove write-protected functionality from it in this article in 5 ways.
Part 1: Why Is My USB Drive Suddenly Write-Protected?
When you think, “Why is my USB drive suddenly write-protected,” only a couple of reasons can lead to this phenomenon. For instance, “the disk is write protected flash drive” issue could be caused by:
- Your USB is set to Read-Only by mistake.
- The physical write-protection lock on your USB drive is enabled.
- Third-party software or a virus caused USB write-protection error.
- BitLocker encryption is active on your flash drive.
Part 2: Recover Data Before Removing Write Protection From USB
Prior to knowing how to disable write protection from pen drive, you must first obtain data from your read-only USB drive. This is because if you’re unable to remove write-protection from it you might have to format it which will wipe away all files from your flash drive. A specialized data recovery tool such as 4DDiG can help you extract all your files safely and with high success from your USB drive. Here are this tool’s primary functions:
- It can extract files from an unreadable, inaccessible, or logically damaged drive.
- It can retrieve 2000+ data types from your USB drive, including images, videos, MS office files, and more.It can regain files from various USB formats FAT32, NTFS, and more.
- It supports latest Windows 10 and 11.
- It offers a free preview of recovered files and allows you to pick your desired file types to scan.
- It provides a simple interface for all skill levels.
- A free version is available.
Follow steps below to use this tool to extract files from your write-protected USB:
Step 1: Download, and install the 4DDiG data recovery tool on your computer. Then, execute it. Next, connect your write-protected USB drive to same PC. Choose specific file types to search for before scanning. Then, hit “Scan.”

Step 2: The tool will search for lost files based on your preferences. Meanwhile, you can switch between “Tree View” or “File View,” or use “Filter” to locate specific data.

Step 3: Once files are extracted from your read-only USB, preview and save them to a safe location on your PC. Now, you can fix the “disk is write protected flash drive” issue with confidence.

Part 3: How Do I Remove Write Protection From USB on Windows 11/10?
Here are 5 options to try. Start with the most basic one which is finding the physical write-protected lock on your USB:
Fix 1: Turn Off Physical Lock
It shouldn’t come as a surprise that many USBs have a physical lock on side or at bottom which prevents you from writing on it. This is a safety feature that stops viruses or malware from permeating your USB when you view its files on an unsafe computer. Therefore, the first step to remove write protection from USB on Windows 11/10 is to turn off that switch.

Fix 2: Use Diskpart
When your USB doesn’t have a physical switch it still might be in a read-only mode but on settings level. So, you can use Diskpart, a Windows command-line utility to clear up read-only attributes from it. Here’s how to disable write protection from pen drive using Diskpart:
Step 1: Press and hold “Windows + R” keys and keep holding them. This will open “Run.” Next, type “diskpart.” Hit “Enter.”
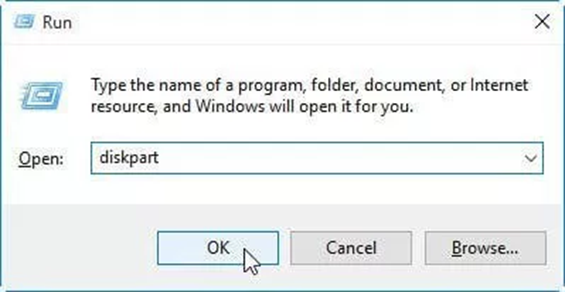
Step 2: If prompted by User Account Control, click “Yes.” Then, type “list disk.” Hit “Enter” to view all disks.
Step 3: Identify your USB drive by its size (e.g., a 14 GB USB is Disk 1). Then, to select it use “select disk 1.” (Here replace “1” with your disk number).
Step 4: Check your USB drive’s attributes with “attributes disk” command. After this, type “attributes disk clear read-only” to remove write protection from USB on Windows 11/10.

Fix 3: Modify Windows Registry Editor
In case you’re unable to remove write protection from USB with Diskpartor don’t want to use its command-line interface, you can modify Windows Registry. It can alter system configurations to fix “the disk is write protected flash drive” error. Here’s how to disable write protection from pen drive by modifying Windows Registry Editor:
Step 1: Press and hold “Windows + R” keys and keep holding them. This will open “Run.” Type regedit. Then, hit “Enter,” This will open Registry Editor.

Step 2: Head to “HKEY_LOCAL_MACHINE\SYSTEM\CurrentControlSet\Control\StorageDevicePolicies.”
Step 3. If StorageDevicePolicies key doesn’t exist, right-click “Control.” Then, select “New.” Tap “Key” and name it “StorageDevicePolicies.”

Step 4: Inside “StorageDevicePolicies,” if needed, create a new value. Right-click on an empty area. Then, select “New.” Press “DWORD (32-bit) Value,” and name it “WriteProtect.” Hit “Enter.”
Step 5: Double-click “WriteProtect.” Set value to 0 to disable write-protection. Close Registry Editor. After this, restart your computer.
Fix 4: Turn Off BitLocker
Still asking the answer to “Why is my USB drive suddenly write-protected?” Or “how can I fix it?” Your flash drive might be encrypted with BitLocker which is mainly used for internal disks, but can also encrypt USB drives. It is usually off by default except if you’re using Windows 11.
But it might have been activated unknowingly or by someone else. To turn it off, you’ll need a password or recovery key for BitLocker lock. So, if your USB drive is write-protected, here’s how to remove write-protected attributes from your flash drive by turning off BitLocker:
Step 1: Open “File Explorer.” Then, look for your USB drive. If the flash drive icon has a padlock, BitLocker is enabled.
Step 2: Right-click USB drive. Then, select “Manage BitLocker.” In BitLocker Drive Encryption window, find USB drive. Then, “Turn Off BitLocker.”

Step 3: Enter password or recovery key to decrypt your USB drive.
Fix 5: Replace or Send It to Repair
Some USB drives have built-in protection that disables write access after a power surge or error, leading to “the disk is write protected flash drive” error. In such a situation, you can’t remove write protection from USB on Windows 11/10. The only solution is to recover data from your read-only flash drive, then, send it either for repair to a professional if you want to give it a try at fixing it or replace it.
Conclusion
Understanding the answer to “Why is my USB drive suddenly write-protected” is crucial to solving it accordingly. Your flash drive could be read-on due to a physical lock, software restriction, or hardware issue. But before you remove write protection from USB, it’s best to recover your data using a specialized tool such as 4DDiG Data Recovery. With support for 2000+ files, it can extract files from various data loss scenarios and storage devices including USB with high success.
Mircari Quotes And Sayings
 Huge Intrinsic Marketplace 113m Series Ventures Hit The Market
 What is QA Tester?
 Examples of a Node Diagram 08/07
 Top 5 New Relic Alternatives
 Beyond the Robot Voice: Achieving Natural and Expressive Text to Voice Narration
 The Importance of Ethical Proxy Providers: Insights into Bright Data Proxy Solutions
 How to Secure Your Personal Devices Against Cyber Threats
 Best Free iPhone VPN Apps to Access Geo-Restricted Content 2025